 A fortnight ago, I was fortunate enough to be invited to attend a two-hour barista course run by the Department of Coffee and Social Affairs in Broadgate, that slightly overlooked part of London just to the north of Liverpool Street Station. The course, one of the Department’s weekly evening barista courses, was part of a week-long event called Savour Broadgate, designed to highlight the growing number of restaurants and cafés in the area, timed to coincide with the opening of Broadgate Circle, home, amongst others, of the latest branch of Beany Green.
The location was the Department’s Liberty of Norton Folgate branch. If that sounds familiar, that’s because until very recently it was known as Liberty of Norton Folgate. The Department of Coffee has always been an interesting chain, each branches having its own name and distinct character. In fact, you’d often struggle to realise that some of the branches were part of the same chain. Until now, that is. The Department of Coffee has decided to brand all nine of its branches “Department of Coffee and Social Affairs”, the name coming from the Department’s very first store on Leather Lane.
Anyway, enough of the background. What about the course?
You can find out how I got on after the gallery.

.")
 fame, seen here drinking something other than coffee. I still think he's got the best hair in coffee.")


.")
 1
1 2
2 3
3 4
4 5
5 6
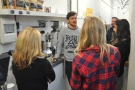
6The Department of Coffee and Social Affairs runs weekly barista courses and monthly coffee brewing courses, held at various of the Department’s branches on weekday evenings. The barista courses focus on small groups of between four and six people. I was there with a couple of paying customers, a competition winner and Daniel, of 100 Cups of London Coffee, most mis-named blog in the world (at the time of writing he’s up to 349!).
The course, run by two of the Department’s most experienced baristas, Chris and John, started with the group tasting some espresso shots expertly pulled by John. Chris led us through the process, designed to get us thinking about coffee and understanding how good espresso tastes. I hadn’t thought of starting a course like this, but it makes perfect sense. Since taste is the ultimate deciding factor, how else do you know how good your espresso is, if not by taste? And, if you don’t know what you’re aiming for, how are you going to know when you’ve got there?
Chris wanted us to take three sips of our espresso. The first was to establish its broad characteristics: body and the main elements of taste, sweet, sour, bitter and salt. Next, our second sip was to look more closely at the taste: was it chocolate, nuts, fruit, etc? Our final sip refined that further. So, for example, if the espresso was fruity, was it citric, berries, etc?
So, that’s how you do it! I can see this coming in useful as I struggle to describe the various coffees I drink…
Next, Chris talked us through the science of extraction, looking at the main variables and giving us the Department’s “recipe” as he went:
- water temperature (between 91.5C and 92.5C)
- water pressure (9 Bar)
- weight in, that is, the amount of ground coffee (20.4 grams)
- weight out, that is, the amount of water going through the coffee (30 grams)
- extraction time (30 seconds)
Obviously these are ideals, so we were also given what can best be described as acceptable tolerances: 20.2 – 20.6 grams in, 27 – 33 grams out for example. Through this, we learnt the importance of measuring what you do, particularly weighing your shots before and after extraction, something I’ve been converted to over the last couple of years. I now, much to the amusement of my friends when I make them espresso, weigh the beans before grinding and then weigh the extracted espresso (the next step on the road down coffee geekery, by the way, which I have yet to take, is to weigh the ground beans in case anything is retained in the grinder).
However, the main lesson I learnt was to time my shots. As any barista will tell you, controlling the variables is vital. For sake of argument, we’ll assume that our espresso machine delivers a consistent 9 bar of pressure at a steady temperature (not something you can necessarily rely on with a home espresso machine). Therefore the other variables are the weight in (which you can also control) and the extraction time/weight out.
There are two ways of doing this. The first is to extract by weight. So, if you’re aiming for 30 grams out, you stop the extraction at 30 grams (and then see how long it took). The alternative, promoted by Chris and John, is to stop the extraction at 30 seconds (and then see how much you’ve extracted by weighing the shot).
With all that in mind, we actually had a go at making espresso. You can see how we got on after the gallery.


 1
1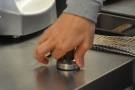 2
2 3
3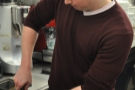 4
4 5
5Well, not quite. Before you can actually pull a shot, you need to know how to prepare your coffee, so the first practical thing we did was to learn how to tamp. Tamping, the art of pressing down on the ground coffee to form a solid, consistent puck, is vitally important and yet often overlooked. First of all, you need is a decent (that is, metal) tamper. If you can, try before you buy, since it’s important that your tamper feels comfortable in your hand.
Tamping techniques vary widely, some favouring a light tamp, others favouring a firmer approach. Chris and John are definitely in the latter school and gave us some practical advice. For a good tamp, you need a straight wrist and high elbow, while holding the portafilter firmly with your other hand, resting it on a solid surface (preferably a counter edge).
Chris recommends resting the tamper’s handle in the palm of your hand and putting your thumb and first two fingers on the rim of the portafilter in a triangle arrangement. In this way, you can better judge how evenly you are applying the pressure, which, as I discovered, is quite critical. Chris’ favoured approach is to press down hard before removing the tamper with a flick (to remove any loose grinds from the top of the puck, a trick I’ve yet to master). Then tamp again, after which you twist the tamper in place without applying any pressure before lifting it straight off.
All this is designed to produce a flat, consistent surface. Why this is important is all to do with the physics of extraction, which is, put simply, forcing hot water under pressure through ground coffee. Water, being water, will take the path of least resistance, which, when you think about it, is common sense. So, if you tamp unevenly, you’ll get uneven extraction. If you have a slightly sloped surface, water will pass more quickly through the thinner side, under-extracting in the process, while passing more slowly in through the thicker layer, leading to over-extraction. While you might hope under-extracted plus over-extracted espresso equals correctly extracted espresso, sadly this is not the case. More likely it’s the worst of both worlds.
Even if your puck’s level, you might have different densities in different parts of the puck, which can happen if the ground coffee is unevenly distributed before tamping or if you tamp unevenly. If, for example, one side is tamped harder than the other, it’s denser, water will take longer to pass through, and you’re over-extracting again. On the other side, the water will flow more quickly, leading to under-extraction.
The last lesson is don’t tap the side of the portafilter once you’ve finished tamping. This technique, designed to remove any loose grounds, can lead to fracturing of the puck. Once again, water will seek out these cracks and flow more quickly through them, leading to under-extraction.
The one thing we didn’t talk too much about was grinding, although it’s just as important as tamping. Getting the correct grind (known in the trade as dialling in) is vital and getting it wrong can lead to similar outcomes. If your grind is too coarse, the water passes through too quickly, leading once again to under-extraction. On the flip side, if the grind is too fine, the water takes too long to pass through the coffee and we have over-extraction.
So, our heads full of all this information, we were finally let loose on the espresso machines. You can see how we got on in Part II of this Saturday Supplement.
At the time I wrote this post, I had a Rancilio Silvia espresso machine at home, which I’ve since replaced with a Sage Barista Express, which I’d heartily recommend. If you want to learn more about making coffee at home, take a look at my Coffee at Home pages.
If you liked this post, please let me know by clicking the “Like” button. If you have a WordPress account and you don’t mind everyone knowing that you liked this post, you can use the “Like this” button right at the bottom instead. [bawlu_buttons]
Don’t forget that you can share this post with your friends using the buttons below.
Pingback: Barista Training at Department of Coffee and Social Affairs: Part II | Brian's Coffee Spot
Pingback: London Coffee Festival 2015: Round-up | Brian's Coffee Spot
Pingback: London Coffee Festival 2015: Coffee Experiences | Brian's Coffee Spot
Pingback: Glasgow Coffee Festival 2015 Part I | Brian's Coffee Spot
Pingback: Cup North 2015 Part II | Brian's Coffee Spot
Pingback: Cup North 2015 Part III | Brian's Coffee Spot
Pingback: Coffee with Luke: a Brewing Masterclass | Brian's Coffee Spot
Pingback: Shoreditch Grind | Brian's Coffee Spot
Pingback: Show and Tell: The Barista – Movementary Micky
Pingback: Sage Barista Express | Brian's Coffee Spot
Pingback: Barista Training at Department of Coffee and Social Affairs: Part II | Brian's Coffee Spot