 A fortnight ago, I was fortunate enough to be invited to attend a two-hour barista course run by the Department of Coffee and Social Affairs in Broadgate. It was part of a week-long event called Savour Broadgate, designed to highlight the growing number of restaurants and cafés in the Broadgate area.
One thing I really appreciated about the course was just how much the two trainers, Chris and John, enjoyed themselves. These weren’t two guys going through the motions at the end of the long day. They were loving every minute of it, even my annoyingly technical questions. It was clear that they both revelled in sharing their knowledge and love of coffee and their enthusiasm was infectious.
In Part I of this Saturday Supplement, I talked about the theory aspect of the course, which was mixed with practical, hands-on examples. If you want a quick recap, we started by tasting (and understanding the taste of) espresso, before going on to learn about espresso extraction and the importance of tamping. Then, armed with all this knowledge, we were let loose on the espresso machines, first to pull some shots, then to make some flat whites.
You can find out how we got on after the gallery.

.")


")
")


 1
1 2
2 3
3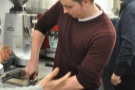 4
4 5
5 6
6 7
7 8
8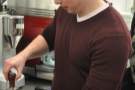 9
9 10
10 11
11 12
12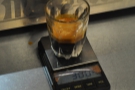 13
13As a prelude to actually pulling a shot, we first had to tamp our coffee, freshly ground for us by the ever-obliging John. When it came to my turn, I very quickly learnt that while I had a good tamping stance, my actual tamping was terrible. Chris showed us an easy trick to see how good we were: hold your portafilter up to your eye level and if the tamper is lopsided, then you’re in trouble. Needless to say, mine were pretty lopsided! This, by the way, is where the finger positions I talked about in Part I come in handy; by positioning your thumb and two fingers around the rim, you should, in theory, be able to better tell if you are distributing the pressure evenly. In theory. In practice, I need more practice!
Having mastered(!) tamping, we were finally let loose on the espresso machine. After fitting the portafilter to the group head (I still get a thrill doing that on a really big, commercial espresso machine) we set the extraction going, weighing the shots as they extracted. We had strict instructions to stop the extraction at 30 seconds, the aim to see how close we got to the magic output weight of 30g (see the recipe in Part I). I was pretty pleased with my 31.2g (slightly under-extracted) but one of our number hit 30g on the nail. Now that’s really impressive!
However, it’s not all about the end weight. Ultimately the only test that counts is the taste test. Under-extracted espresso tastes sour (in a bad way) and insipid, while over-extracted espresso is bitter. Although the aim is to extract in 30 seconds, you should always watch the streams for any early signs that things are going well (or wrong!).
If the coffee starts streaming out within a few seconds, the grind is too coarse or the tamp too light. Similarly, if you’re 15 seconds into your extraction and nothing’s come out yet, you’re in trouble. You’ve tamped too hard, or your grind is too fine (more likely). Or perhaps your machine’s clogged up. Come on, honestly now: when was the last time you cleaned the group head and back-flushed your espresso machine? [Note to self: must remember to clean and back-flush Silvia…]
The other sign that things are going wrong is if you’re getting coffee coming out of one spout but not the other. This indicates that you’ve got channelling going on; with the coffee passing more quickly through one side of the puck, usually the result of an uneven tamp. Unsurprisingly, given my uneven tamping, this is something I’ve suffered from a lot at home, but thanks to this course, I’ve almost eradicated it! I’ve also, thanks to my new-found dedication for timing, really increased the consistency of my shots. Clearly my time was well spent!
The final part of the course was all about milk. You can see how we got on after the gallery.


")


 1
1 2
2 3
3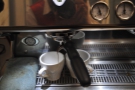 4
4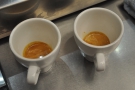 5
5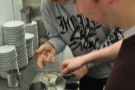 6
6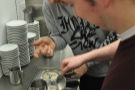 7
7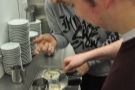 8
8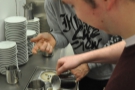 9
9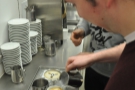 10
10 11
11 12
12 13
13As with all other aspects of the course, practice was preceded with theory, in particular, why less is more when it comes to milk. The Department of Coffee and Social Affairs serves flat whites in 5¾ oz tulip cups, which, coincidently, is pretty much the size of a classic, old-school Italian cappuccino. There are a couple of reasons for this, the obvious one being that the more milk there is, the more diluted the coffee becomes and you start to lose its taste.
The less obvious one, and the one I’d not considered before, is to do with the temperature of the milk. As an aside, if you overheat milk, its chemistry changes (the short version is that you burn the milk and the proteins start to break down). The result is that milk begins to lose its taste, which is why well-steamed milk should be around 65⁰C, and certainly no more than 70⁰C.
Of course, if you’re serving drinks with milk at this temperature, it doesn’t do to leave them standing around too long, otherwise they’ll be cold by the time you finish it. Therefore, you want something you can easily drink it while it’s still warm. Trial and error over the years has determined that the ideal size is around 5-6oz, which is why both the classic cappuccino and flat white are pretty much the same size.
So, having got that out of the way, it was time to learn how to actually steam milk. For a flat white, the aim is to produce a micro-foam, a dense creamy foam rather than the airy, frothy foam found on top of old-school cappuccinos.
The starting point is cold, full-fat milk (if you can’t get full-fat, semi-skimmed is okay, but anything less than that doesn’t steam well) in a metal jug. It’s important to get the correct size jug for the amount you’re steaming; ideally you want the jug to be twice the volume of the milk (as a result of this course I bought a new, smaller milk jug and it’s made all the difference to my steaming at home).
Next, how to hold the jug: according to Chris, you want to hold the handle without your fingers touching the side of the jug (which will get hot!). Rest the steam wand on the lip of the jug, its tip off-centre and just below the milk’s surface. Then turn the steam wand full on and away we go.
The first phase, known as stretching, is where you introduce air into the milk. You need the wand just below the surface to get enough air in quickly enough before the milk heats up too much. Listening to your milk is very important. If there’s little sound, the wand’s too deep and no air’s getting in; if it screams, it’s not deep enough and your bubbles will be too big. Since you’ve got the tip off-centre, the milk will naturally swirl around in the jug; you don’t need to move it around yourself.
According to Chris, once you’ve stretched the milk for around five seconds, you’ll have incorporated enough air, so raise the jug slightly (which moves the wand deeper into the milk). Now you’re just heating the milk. Practice will tell you when it’s hot enough, but until then, John recommends a milk thermometer. Alternatively, cup the jug with your spare hand until it’s too hot to comfortably touch.
Now you have perfectly steamed milk, so all that’s left is to create the latte art, which is a whole course in itself… Naturally we all had a go and some of us were better than others. You’ll have seen our results in the gallery; they’re hilarious!
I’ll leave you with some closing thoughts and conclusions. The first is that I really, really enjoyed myself, far more than I thought I would. I also learnt a lot, again far more than I thought I would. Not that I thought I knew it all, but I was surprised by how many things I hadn’t considered.
I’ve taken three things away from the course, all of which have already started improving my home espresso making:
- better tamping
- timing my shots
- steaming my milk
If you are making espresso at home, then I’d really recommend a barista course and the Department of Coffee and Social Affairs one in particular.
At the time I wrote this post, I had a Rancilio Silvia espresso machine at home, which I’ve since replaced with a Sage Barista Express, which I’d heartily recommend. If you want to learn more about making coffee at home, take a look at my Coffee at Home pages.
If you liked this post, please let me know by clicking the “Like” button. If you have a WordPress account and you don’t mind everyone knowing that you liked this post, you can use the “Like this” button right at the bottom instead. [bawlu_buttons]
Don’t forget that you can share this post with your friends using the buttons below.