 I began my Making Coffee at Home series in March 2020 as a response to the COVID-19 pandemic. With many people confined to their homes, and perhaps making coffee for the first time, I wanted to offer simple, practical advice about how to make great coffee. This page gathers together all the new articles I wrote, along with a couple of older articles about storing coffee and roasting your own coffee at home thrown in for good measure!
Just to be clear, this series is not meant to be a definitive “how to make” set of features. There are far-better qualified people than me doing that, particularly since the start of COVID-19, with many roasters and baristas producing videos and articles on all aspects of making coffee. If you want somewhere to start and enjoy videos, I recommend subscribing to James Hoffman’s excellent YouTube channel. Alternative, old friends Carvetii Coffee Roasters, has a growing series of guides on its website.
Instead, my Coffee at Home series is meant to get you under way, particularly if you’ve not made coffee at home before or are looking to improve your coffee making. So, with that in mind, here are all the articles I’ve published so far.
Making Coffee at Home: Cafetiere
With the COVID-19 crisis in full swing, most people will be making coffee at home for the foreseeable future. While I’m rather obsessive about my home coffee making (fancy scales, hand grinder, gooseneck kettle, multiple filter methods, espresso machine...) and even have my own travelling coffee kit, that’s not for this post. Rather, I’m going back to my coffee-making roots with the method I used before I got swallowed by the speciality coffee rabbit hole. Hopefully this will help anyone not used to making coffee at home.
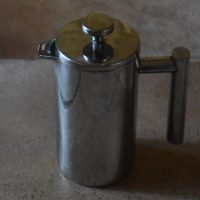
So, rather than write about my AeroPress, V60 or Clever Dripper, this post is all about the humble cafetiere (aka French Press) which I still use to make my morning coffee every day. I find it a simple, reliable and, above all, forgiving way of making coffee. It’s also very scalable: using the same basic recipe you can make coffee for one person just as easily as you can for three or four (as long as you have a big enough cafetiere, of course). All you really need is coffee, a cafetiere, mug, kettle and a timer, although the most important thing you can add is a grinder, which will improve things immensely!
Continue reading...Making Coffee at Home: Cafetiere Clean-up Made Easy
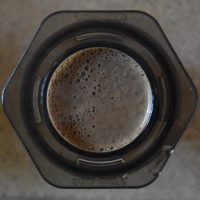
The very first Making Coffee at Home post I wrote, before I even knew I’d create a whole Coffee at Home section for the Coffee Spot, was a simple guide to making better coffee with the cafetiere. To this day, for all the fancy pour-over methods I have at my disposable, or other immersion methods, such as the AeroPress or Clever Dripper, not to mention my home espresso machine, the cafetiere (or French Press), is still my go-to method for making my morning coffee.
One of the complaints I regularly hear about the cafetiere is that it’s difficult to clean up after a brew. This is something that I’ve never understood, since disposing of the used grounds in a cafetiere is ridiculously easy. Okay, so it’s not quite as simple as tossing a used paper pour-over filter, grounds and all, or popping an AeroPress puck into the compost, but it’s less hassle than, say, cleaning a reusable cloth filter.
So why does the cafetiere have a reputation that it’s difficult to clean up? I suspect it’s because lots of people don’t actually know how to dispose of the used grounds, so to rectify that, I’ve written this little guide.
Continue reading...Making Coffee at Home: Grinding
 Last week I wrote about making coffee at home, using just a cafetiere and kettle. At the time, I said that the most important thing you can add is a grinder, so picking up on that, here’s a short post on the importance of grinding your own coffee at home, including some practical advice to help get you started.
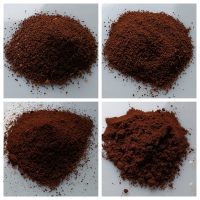
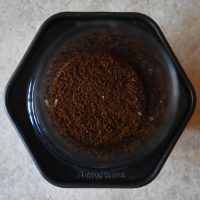
The simple reason I advise everyone to grind their own coffee is that it tastes better! Coffee ages over time, slowly losing its taste, but ground coffee ages incredibly quickly (it’s to do with the amount of surface area exposed to the air). In contrast, whole beans keep much longer (and can be successfully frozen to further prolong their life). You then just grind the beans you need, ideally right before brewing, and off you go. You should notice an immediate improvement in taste.
Like many things in coffee, it can seem a little daunting at first, but grinding your own coffee needn’t be difficult, particularly if you are only grinding for one preparation method, which means you’re not always fiddling around with settings. In this post, I’ll talk about selecting a grinder and the all-important consideration: how fine to grind!
Continue reading...Making Coffee at Home: Clever Dripper
 Two weeks ago, I launched my Coffee at Home series (which now has its own page on the Coffee Spot) with a simple guide to the cafetiere to get you started, followed by a piece on the importance of getting a grinder at home. As I explained in the cafetiere guide, it works well for bold coffees (I typically use it with espresso blends) but less well for subtle or delicate single-origins. So today I’m taking you one step further with a method that’s more suitable for those subtle/delicate single-origin coffees.
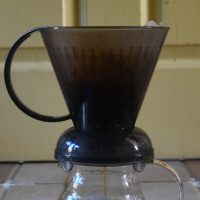
I’ll be honest: there are plenty of excellent filter methods out there, each with its own set of devoted fans. There’s the AeroPress, V60, Chemex and Kalita Wave to name a few. However, today I’m writing about the Clever Dripper, which, in my opinion, is the easiest method for those of you taking your next steps into home-brewing. Like the cafetiere, it doesn’t require any fancy equipment, other than the Clever Dripper itself and some filter papers. It also shares other important characteristics with the cafetiere: it’s simple, reliable and, above all, very forgiving. All you really need is coffee, a mug, kettle and a timer (plus, ideally, a grinder).
Continue reading...Making Coffee at Home: Clever Dripper (Revisited)
One of the earliest pieces I wrote for my (then new) Coffee at Home series at the start of the COVID-19 pandemic was about the Clever Dripper. Although there are plenty of excellent filter methods, the Clever Dripper is, in my opinion, the easiest one for somebody taking their first steps into home coffee brewing. Like the humble cafetiere, it doesn’t require any fancy equipment, other than the Clever Dripper itself and some filter papers. It also shares other important characteristics with the cafetiere: it’s simple, reliable and, above all, very forgiving.
I’ve been using my Clever Dripper throughout the last year: it’s my go-to method for filter coffee during the day, mostly for the reasons I’ve stated above. However, I’ve a confession to make: I no longer use the method I published in April last year. As regular readers will know, I’ve become a devotee of James Hoffman’s YouTube channel, and, in early December, James published his Ultimate Clever Dripper Guide. This gives a surprisingly different way of using the Clever Dripper and, having tried it, I was immediately converted. I’ve been using the new method ever since, so thought it was about time I updated my own guide.
Continue reading...Making Coffee at Home: AeroPress
 Welcome to another instalment of my Coffee at Home series (which now has its own page on the Coffee Spot). I started three weeks ago with a simple guide to the cafetiere to help (non-coffee) people who have unexpectedly found themselves at home all day due to COVID-19 make good coffee. I’ve also published articles on the importance of grinding coffee at home, as well as a guide to the Clever Dripper, another simple, reliable method. Today it’s the turn of the AeroPress, one of the coffee world’s favourite preparation methods (it’s even got its own World Championship!).
I’m a big fan of the AeroPress, so much so that I have three of them (one for home, one at my Dad’s and one that forms an integral part of my travelling coffee kit). However, it wasn’t always the case. I got my first AeroPress at the end of 2012, when I visited Leighton Buzzard’s House of Coffee, but I really didn’t get on with it. In fact, had it not been for a chance encounter at the Caffé Culture Show in May of the following year, I might have given up on it entirely. So, what changed? And why?
Continue reading...Making Coffee at Home: AeroPress (Revisited)
 When I started my Coffee at Home series at the beginning of the COVID-19 pandemic in April 2020, the aim was to present some simple ways of improving your home coffee making. My post on the AeroPress was part of my Coffee Preparation Methods series, simple guides on how I use various coffee brewing methods. In it, I wrote about my early struggles with the AeroPress, how I came to fall in love with it, finishing with my preferred way of using the AeroPress, the inverted method.
Fast forward six months, and, as the pandemic dragged on, I took to binge-watching James Hoffmann’s excellent You Tube channel (if you haven’t discovered it yet, I thoroughly recommend it). Since then, I’ve become an avid watcher and, along the way, I’ve learnt an awful lot. Just one example is the Clever Dripper, a method I liked but sometimes struggled with. Then along came James with his Ultimate Clever Dripper Guide and it completely changed the way I brewed with the Clever Dripper.
So, when James released his much anticipated five-part AeroPress Guide, I was intrigued. Would it confirm everything I’d been doing with my AeroPress, or turn everything on its head again?
Continue reading...Making Coffee at Home: Scales
 Welcome to another instalment of my Coffee at Home series which has, to date, focused mostly on brewing methods, with simples guides to the cafetiere, Clever Dripper and AeroPress. However, I’ve also written about grinding coffee at home, while today I want to turn my attention to another important piece of equipment: scales.
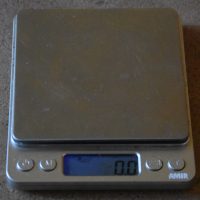
Let’s start by answering a simple question: do you need scales in order to make good coffee? Emphatically, no, you don’t. As I’ve shown in my first three guides, you can make good coffee without scales. However, that doesn’t mean that scales should be overlooked, particularly as you get drawn further into the world of speciality coffee (warning: in case you haven’t guessed, that’s what this series is all about, drawing you slowly down the rabbit hole of speciality coffee, one article at a time, until it’s too late and you can’t back out).
Back to scales. Scales can be very useful: for example, I use them whenever I make coffee. In particular, as you approach the more specialised end of coffee making, such as pour-over and espresso, I’d argue that scales start to become essential. So, with that in mind, what should you be looking for?
Continue reading...Making Coffee at Home: Pour-over
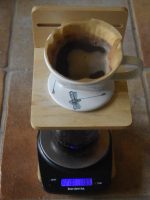 Welcome to another instalment of my Making Coffee at Home series. After a brief diversion to look at coffee itself, I’ve returned to coffee-making techniques. So far, I’ve written simple guides for the cafetiere, Clever Dripper and AeroPress. In contrast, today’s Making Coffee at Home isn’t focused on a single method. Instead, I’m looking at the broad category of pour-over filters, any device where you pour water over coffee grounds and it filters through the bottom.
There are many filter devices out there, made from various materials (plastic, glass, ceramic and metal) with a wide variety of designs. Pour-over is also one of the oldest coffee-making methods: the Melitta Filter, for example, was patented in 1908, making it older than the cafetiere (1929). These days, probably the most commonly recognised are the Chemex (invented in 1941) and the much more recent Hario V60 (2004).
One of the reasons I’ve left pour-over until now is that, after espresso, it’s the method I’ve struggled with the most, giving up on it for long periods. Although you can get away with making pour-over using just a kettle, filter and filter papers, this is one method where having the extra kit really pays off.
Continue reading...Making Coffee at Home: Espresso
 Welcome to another instalment of my Making Coffee at Home series, where I’ve left the best (hardest?) until last. After simple guides for the cafetiere, Clever Dripper, AeroPress and (not so simple) pour-over, I’ve finally turned my attention to espresso. Just to be clear, whereas for all my other guides (including pour-over to some extent), you can get decent results with minimal outlay, this is not true for espresso. If you want good espresso, you’re going to need to spend a lot of money on both a good espresso machine and a high-quality grinder (I’d say a minimum of £500).
Now that’s not to say that you can’t made short, strong black coffee at home. You can. The AeroPress, Vietnamese cup-top filter, ibrik/cezve, moka pot and capsule machines can all make good short, strong black coffee. It’s just not going to be espresso. That said, if you’re hankering after something approaching your favourite flat white/cappuccino/latte, then you can do a reasonable job with a variety of common coffee-making equipment (see, for example, this excellent video from James Hoffman). However, what this post is all about is espresso of the sort you’d get in a good speciality coffee shop.
Continue reading...Making Coffee at Home: Moka Pot
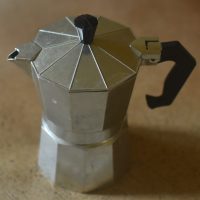 Up until now, Making Coffee at Home has focusedon brew methods which I regularly use: cafetiere, Clever Dripper, AeroPress, pour-over and espresso. Today’s post is different since I’m writing about the moka pot, something which I own, but stopped using many years ago, unhappy with the results. I moved onto other brewing methods and my moka pot has sat at the back of a shelf ever since.
My interest was initially rekindled by tweets from Phil Wain (editor of Caffeine Magazine) which got me thinking that maybe I should write about the moka pot after all. I began the Making Coffee at Home series with a desire to help people make good coffee at home, particularly people who are new to making good coffee. Although I’ve tried to take you on a journey through the various preparation methods I regularly use, I know that not everyone will have the time to invest in learning a new method. Similarly, many of you won’t want to buy new coffee equipment. However, I suspect that, like me, plenty of you have a moka pot somewhere in your kitchen. So, I got my moka pot down, dusted it off and here we are...
Continue reading...Making Coffee at Home: Water
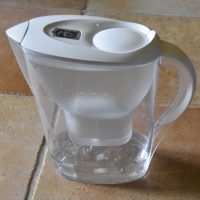 My Making Coffee at Home series is designed to help you make better coffee at home. I’ve written about various coffee brewing methods, discussed the importance of equipment such as grinders and scales, and even talked about the coffee itself. However, there’s one important topic that I haven’t mentioned until now, and that’s water.
Given that a cup of coffee contains around 98% water, it seems obvious that it’s important, but it’s often overlooked. Although water quality is pretty good in the developed world (that is, it’s drinkable and won’t make you ill), its chemical composition varies widely. Water contains all sorts of dissolved minerals which affect both its taste and its ability to extract the flavours in coffee.
You might think that distilled water (that is, pure H2O, with no dissolved materials) would be the answer, but it’s not. Distilled water is actually rather poor at extracting coffee: it turns out that minerals such as calcium and magnesium (both common in water), are rather useful in enhancing extraction, while carbonates also play a role. So in today’s Making Coffee at Home, I’m going to look at what makes good water for coffee, and, more importantly, how to get it.
Continue reading...Making Coffee at Home: Cloth Filters
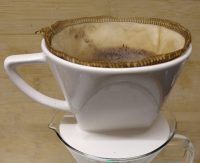 When I first made coffee at home, over 25 years ago, I used a cheap filter machine, but I didn’t like the taste its metal filter imparted to the coffee, so I switched to the cafetiere and never looked back. Years later, when I started experimenting with home pour-over and other methods such as the Clever Dripper, I naturally used paper filters (I’ve had the occasional metal filter but never got on with them).
For several years, I’ve toyed with getting cloth filters to use at home. However, inertia and a general sense that they were a bit of a faff compared to paper filters put me off (which is odd, since many of the other little rituals around making coffee don’t bother me). Then, on my last trip to see Amanda in November, we were in GoGo Refill, a low-waste store in South Portland, where I saw some cloth filters from CoffeeSock.
To cut a long story short, I bought a pair, one for a Chemex and one for a standard two-cup ridge-bottom filter (like my collapsible travel filter). After using them on and off for the last two months, I thought it was time to share my thoughts.
Continue reading...Making Coffee at Home: Manual vs Electric Grinders
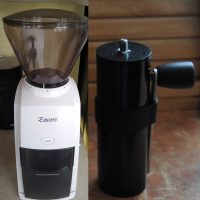 One of the first pieces I wrote for my Making Coffee at Home series in early 2020 was on the importance of grinding coffee at home. Every now and then people ask me for advice on what sort of coffee grinder they should buy and while the article has some general advice (always get a burr grinder), I stumble over the question of whether to recommend a manual or electric burr grinder.
Regular readers will know that I have a soft spot for manual coffee grinders. After all, I own three of them: a pair of Feldgrinds and an Aergrind, all from Knock. I do have an electric burr grinder, but this is built into my Sage Barista Express. In theory, I could use it for grinding for filter coffee as well, but in practice, I use it exclusively for espresso, sticking to my Feldgrind for my daily cafetiere, pour-over and AeroPress.
However, when I was visiting Amanda last November, I had the chance to use her Baratza Encore for an extended period of time. This allowed me to make a direct comparison between electric (the Encore) and manual (my Aergrind) grinders as I made our morning cafetieres and daily pour-overs.
Continue reading...Making Coffee at Home: Soulhand Vacuum Canister
 Welcome to the latest instalment in my Making Coffee at Home series, which is all about storing coffee beans at home. Other than a post about keeping coffee beans in the freezer, it’s not something that I’ve written much about. Coffee’s twin enemies, when it comes to freshness, are air and light, so the standard advice, once you have opened a bag of coffee, is to store the beans in an airtight container away from directly sunlight.
Typically, I’ll put around 80 grams of beans into an airtight container, storing the rest in the original bag (which, if it’s not resealable, I’ll pop into a larger container) in the cupboard. This means I’m not exposing the bulk of the coffee to fresh air every time I open the bag/container.
However, there is an alternative, which prompted me to the write this post. A couple of weeks ago, the folks at Soulhand offered me a vacuum canister. It’s something I’ve been thinking about getting for a while, so naturally, I jumped at the chance. Vacuum canisters, as the name suggests, work by removing (almost) all the air from the canister, which, in theory keeps the coffee fresh for longer.
Continue reading...Making Coffee at Home: Vacuum Canisters Revisited
Welcome to the latest instalment in my Making Coffee at Home series, which takes another look at storing coffee beans in vacuum canisters. At the start of the year, I received the gift of a vacuum canister from Soulhand (a company which also gifted me a gooseneck kettle the year before). Vacuum canisters, as the name suggests, work by removing (almost) all the air from the canister, which, in theory, keeps coffee fresh for longer than storing it in an airtight container.
My initial post about the Soulhand vacuum canister was written not long after I received it. I covered the principles behind vacuum canisters and the Soulhand vacuum canister itself, including what it was like to use. I also did some simple comparisons between beans that were stored in the canister and those kept in an airtight container (my usual practice for storing beans). Unfortunately, the results were inconclusive, largely because over the short timescales involved (a week), I wouldn’t have expected the coffee to go stale. However, at the end of the post, I explained that I’d set up an experiment to see what difference storing beans in a vacuum canister makes over a longer period of time…
Continue reading...Keeping Coffee Beans in the Freezer
 I want to tackle a subject that is, to some speciality coffee people, anathema. No, not decaf, I did that already. Today, I’m talking about storing coffee, long-term, in the freezer.
There’s a wide consensus on how coffee should be ideally stored: as whole beans, in an airtight container, in a cool, dark place. Never store ground coffee (ie always grind just before you use it) and never store your coffee in the refrigerator. But what about the freezer?
You see, I have a problem. These days, I’m never short of coffee, with people regularly send me things to try. More often than not, though, the bulk of my coffee is given to me at festivals, where I usually return with two or three kg of coffee, many times more than I can drink in a reasonable timescale. Some I will use immediately, some I will give away, but the question is, what to do with the rest?
Since I can’t face letting it go to waste, my solution has been to store it in the freezer, something that’s created a bit of storm on twitter, if the impromptu poll I put up last night is anything to go by...
Continue reading...Return to the main Coffee at Home page.