 This page collates all articles that I’ve written over the history of the Coffee Spot (which has been going since 2012) featuring home coffee equipment (which is grander than it sounds). In truth, I mostly write about coffee shops, with the occasional sideline in travel writing. However, I have written a few articles about home coffee equipment and, with the onset COVID-19, I launched my Making Coffee at Home series, which spurred the creation of this page as a single place to bring all these articles together.
Over the years I’ve written about an eclectic range of home coffee making equipment. It’s mostly been equipment that I own, such as my gooseneck kettle and espresso machine, or my various hand grinders. However, there are also features on my travelling coffee equipment should you be so inspired to take your coffee on your travels once the COVID-19 restrictions are lifted.
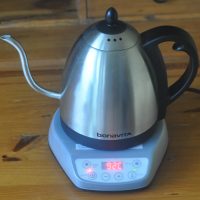
Bonavita Gooseneck Kettle
 Since I started the Coffee Spot almost four years ago, I’ve changed both the way I make my coffee at home and the way I drink it. From primarily using a cafetiere and putting with milk in my coffee, I now always drink it black. Along the way, I’ve picked up a variety of coffee-making methods, including my trusty Aeropress, several different types of pour-over filter cone and I’ve even got a travel-friendly equivalent to my cafetiere in the shape of the Espro Travel Press.
With these new methods have come new techniques and, inevitably, new tools. For example, I now use scales, not just to weigh my beans, but also to measure the amount of water I use when making filter coffee. However, until recently, the one item I lacked was a gooseneck pouring kettle. Initially, I poured from a jug, before progressing to an old coffee pot with a long spout that I picked up from Oxfam.
At that point, I rather fancied the gooseneck kettle to be an unnecessary luxury, a stylish accessory that added looks, but not substance. Then I actually used one and suddenly, everything was turned on its head…
Continue reading...Coffee Gator Espresso Machine
 I’m the first to admit that I’ve been spoilt in recent years when it comes to home espresso, starting with my Rancilio Silvia espresso machine which I bought in 2013, along with a Rancilio Rocky grinder. Things got even better when, just over five years ago, I received the gift of a Sage Barista Express, complete with built-in grinder, which I’ve been using ever since. On both occasions, they resulted in a large step up in the quality of my home espresso, reinforcing my prejudice against cheap espresso machines, which I’d previously dabbled with.
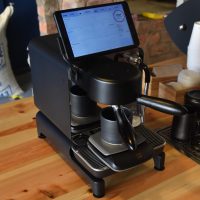
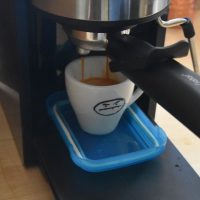
So, when Amanda told me in March that she’d bought a $150 (£100) espresso machine from Coffee Gator, my heart sank. I felt that cheap espresso machines were a false economy: anything below a certain price-point (roughly the cost of a Sage Barista Express) was unlikely to make an acceptable espresso. Arriving to visit a month later, I fully expected to be disappointed, approaching the new espresso machine with a sense of trepidation. And let me tell you, I hated it. And I still do. Using it to make espresso is not a particularly enjoyable experience. But here’s the thing. It actually makes pretty decent espresso…
Continue reading...Decent Espresso
 In October 2016, I was in Hong Kong at the start of my around the world trip. As a result of an intriguing e-mail I’d received from John, of Decent Espresso, I found myself in a multi-floored factory building in an out-of-the-way part of the New Territories. It was there that I first laid eyes on the Decent Espresso machine, a high-end home espresso machine that John and his team had under development.
What I saw was just a prototype, still on the lab bench, but I could see its potential, particularly as John explained his design philosophy. The goal was certainly ambitious: to produce performance equivalent to that of a professional espresso machine, but at a price which would be in the reach of the home enthusiast.
Perhaps most exciting of all was the use of a dedicated Android tablet, running bespoke software from Decent Espresso, to control the machine. Using the tablet, you would be able to control every aspect of the process, from pressure to water temperature, from flow-rates to shot times.
However, that was a prototype, and there was plenty of work still to be done. Would the final product live up to the promise?
Continue reading...Improving the Coffee Gator Espresso Machine, Part I
 Last week I wrote about Amanda’s new Coffee Gator espresso machine, which she’d bought for under $150. I was fully expecting to be disappointed, but to my surprise, it made consistently good espresso, far surpassing my expectations. However, after years of being spoilt when it comes to home espresso, including spending the last five years using a Sage Barista Express, I found almost everything about the Coffee Gator, other than the quality of the espresso, to be intensely annoying.
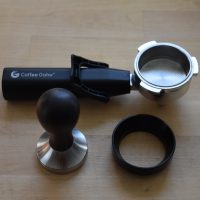
As a machine to prep, use and clean up afterwards, it is incredibly frustrating. This is largely an inevitable consequence of making a machine that can sell for under $150, but as soon as I began using it, I started to think of ways I could improve the experience, which is the subject of this series of posts. I present some potential improvements, including simple accessories and some workarounds to allow you to weigh and time shots in real time (depending on your scales).
This post, Part I, considers two simple and cheap accessories which can improve the workflow during preparation. I also talk about an alternative to the Coffee Gator’s pressurised basket, which I’ll cover in detail in Part III.
Continue reading...Improving the Coffee Gator Espresso Machine, Part II
 Last month I wrote about Amanda’s new Coffee Gator espresso machine, which she’d bought for under $150. Although it far exceeded my expectations and consistently makes good espresso, I found almost everything else about the Coffee Gator to be intensely annoying, particularly after spending the last five years using my Sage Barista Express. As a result, as soon as I began using the Coffee Gator, I started to think of ways that I could improve the experience, which in turn has led to this series of posts.
In Part I, I wrote about a couple of cheap accessories (a dosing funnel and a proper tamper), which improve the workflow during preparation. Today’s post is focussed on improving the experience of pulling shots and is all about how you can weigh shots with the Coffee Gator. Depending on what equipment you already have, this can be a no-cost option. That said, even if you don’t have any scales, these days, high-quality coffee scales are easily affordable, and I strongly recommend that you get some.
The third and final post in the series will look at the pros and cons of upgrading the Coffee Gator’s pressurised basket, which you might want to consider.
Continue reading...Made by Knock: Aergrind
 For a long time, my go-to hand-grinder has been made by Knock, which produces a range of top-quality hand-grinders. I actually have two Knock grinders, Woody, the world’s first wooden feldgrind and Red, which is a feldfarb, the metal version of the feldgrind. I wrote a comprehensive article about Woody two years ago and since then both Woody and Red have received extensive use.
What sets Knock’s grinders apart from the cheaper hand-grinders on the market is the use of a high-quality steel burr set. This gives far superior grind consistency (not to mention being easier to use) when compared to the ceramic burrs used in entry-level grinders. The Knock grinders also have the easiest adjustment mechanism I’ve seen on any hand-grinder.
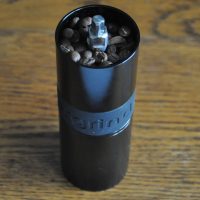
Earlier this year, Knock created something of a stir by launching a Kickstarter campaign for a new grinder, the Aergrind, which was fully subscribed in less than a day. I got my first look at a prototype at this year’s Glasgow Coffee Festival, and I have to say I was impressed. Then, towards the end of last month, there was a knock at the door and there was the postman with a package for me. A cylindrical package…
Continue reading...Made by Knock: Hausgrind and Feldgrind
 I first came across Made by Knock (technically the company is Knock, but goes by “Made By Knock” on the web) and its fabulous hand-grinders at last year’s London Coffee Festival. Several people told me about these wonderful wooden grinders that I had to see. So, on the final day of the festival, I made my way to Knock’s stand and spent a happy hour with Peter, Knock’s co-owner, playing with the grinder, the hausgrind, and watching various demonstrations. From my enthusiastic write-up, you could tell that I had already fallen in love with the hausgrind.
My next encounter came later that year at Cup North, where I ran into Peter and Knock on the Dear Green Coffee stand. Here I discovered that Knock had a smaller, lighter (and cheaper) version of the hausgrind, the feldgrind. I fear that in a moment of madness, I may have agreed to buy one.
Fast forward a few weeks and I was on a train to Edinburgh and, before long, was making my way down to Portobello, the home of Knock, where I had an appointment with Peter and, unknown to me, a very endearing little chap called Woody…
Continue reading...Making Coffee at Home: Cloth Filters
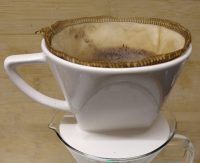 When I first made coffee at home, over 25 years ago, I used a cheap filter machine, but I didn’t like the taste its metal filter imparted to the coffee, so I switched to the cafetiere and never looked back. Years later, when I started experimenting with home pour-over and other methods such as the Clever Dripper, I naturally used paper filters (I’ve had the occasional metal filter but never got on with them).
For several years, I’ve toyed with getting cloth filters to use at home. However, inertia and a general sense that they were a bit of a faff compared to paper filters put me off (which is odd, since many of the other little rituals around making coffee don’t bother me). Then, on my last trip to see Amanda in November, we were in GoGo Refill, a low-waste store in South Portland, where I saw some cloth filters from CoffeeSock.
To cut a long story short, I bought a pair, one for a Chemex and one for a standard two-cup ridge-bottom filter (like my collapsible travel filter). After using them on and off for the last two months, I thought it was time to share my thoughts.
Continue reading...Making Coffee at Home: Manual vs Electric Grinders
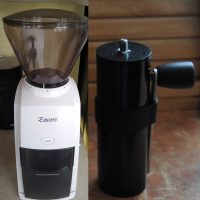 One of the first pieces I wrote for my Making Coffee at Home series in early 2020 was on the importance of grinding coffee at home. Every now and then people ask me for advice on what sort of coffee grinder they should buy and while the article has some general advice (always get a burr grinder), I stumble over the question of whether to recommend a manual or electric burr grinder.
Regular readers will know that I have a soft spot for manual coffee grinders. After all, I own three of them: a pair of Feldgrinds and an Aergrind, all from Knock. I do have an electric burr grinder, but this is built into my Sage Barista Express. In theory, I could use it for grinding for filter coffee as well, but in practice, I use it exclusively for espresso, sticking to my Feldgrind for my daily cafetiere, pour-over and AeroPress.
However, when I was visiting Amanda last November, I had the chance to use her Baratza Encore for an extended period of time. This allowed me to make a direct comparison between electric (the Encore) and manual (my Aergrind) grinders as I made our morning cafetieres and daily pour-overs.
Continue reading...Making Coffee at Home: Scales
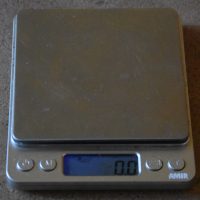 Welcome to another instalment of my Coffee at Home series which has, to date, focused mostly on brewing methods, with simples guides to the cafetiere, Clever Dripper and AeroPress. However, I’ve also written about grinding coffee at home, while today I want to turn my attention to another important piece of equipment: scales.
Let’s start by answering a simple question: do you need scales in order to make good coffee? Emphatically, no, you don’t. As I’ve shown in my first three guides, you can make good coffee without scales. However, that doesn’t mean that scales should be overlooked, particularly as you get drawn further into the world of speciality coffee (warning: in case you haven’t guessed, that’s what this series is all about, drawing you slowly down the rabbit hole of speciality coffee, one article at a time, until it’s too late and you can’t back out).
Back to scales. Scales can be very useful: for example, I use them whenever I make coffee. In particular, as you approach the more specialised end of coffee making, such as pour-over and espresso, I’d argue that scales start to become essential. So, with that in mind, what should you be looking for?
Continue reading...Making Coffee at Home: Soulhand Vacuum Canister
 Welcome to the latest instalment in my Making Coffee at Home series, which is all about storing coffee beans at home. Other than a post about keeping coffee beans in the freezer, it’s not something that I’ve written much about. Coffee’s twin enemies, when it comes to freshness, are air and light, so the standard advice, once you have opened a bag of coffee, is to store the beans in an airtight container away from directly sunlight.
Typically, I’ll put around 80 grams of beans into an airtight container, storing the rest in the original bag (which, if it’s not resealable, I’ll pop into a larger container) in the cupboard. This means I’m not exposing the bulk of the coffee to fresh air every time I open the bag/container.
However, there is an alternative, which prompted me to the write this post. A couple of weeks ago, the folks at Soulhand offered me a vacuum canister. It’s something I’ve been thinking about getting for a while, so naturally, I jumped at the chance. Vacuum canisters, as the name suggests, work by removing (almost) all the air from the canister, which, in theory keeps the coffee fresh for longer.
Continue reading...Making Coffee at Home: Vacuum Canisters Revisited
Welcome to the latest instalment in my Making Coffee at Home series, which takes another look at storing coffee beans in vacuum canisters. At the start of the year, I received the gift of a vacuum canister from Soulhand (a company which also gifted me a gooseneck kettle the year before). Vacuum canisters, as the name suggests, work by removing (almost) all the air from the canister, which, in theory, keeps coffee fresh for longer than storing it in an airtight container.
My initial post about the Soulhand vacuum canister was written not long after I received it. I covered the principles behind vacuum canisters and the Soulhand vacuum canister itself, including what it was like to use. I also did some simple comparisons between beans that were stored in the canister and those kept in an airtight container (my usual practice for storing beans). Unfortunately, the results were inconclusive, largely because over the short timescales involved (a week), I wouldn’t have expected the coffee to go stale. However, at the end of the post, I explained that I’d set up an experiment to see what difference storing beans in a vacuum canister makes over a longer period of time…
Continue reading...My Travelling Coffee Kit
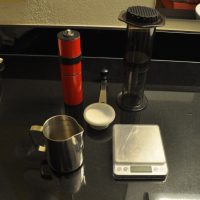 A little while ago, a reader, Linda, got in touch to ask me how I managed when travelling to places where there was no good coffee. This made me realise what a very good question that was. While I’ve written on several occasions about my penchant for making my own coffee on long-haul flights and overnight trains, as well as hinting on other occasions about making my own coffee in hotels, I realise that I’ve never really addressed the issue in a comprehensive matter.
Over the five years I’ve been writing the Coffee Spot, I’ve gone from drinking whatever I’m given to being quite obsessive above bringing my own coffee and coffee-making equipment. I’m not quite sure when this started, but it’s become increasingly important with the amount of travelling I’m doing. As an example, tomorrow I’m off to Manchester for a week for work, then the weekend after that, I’ll be in Leeds, before flying to Chicago for three weeks (work + play). I can’t imagine being away for all that time without decent coffee, so I’ve assembled a basic travelling kit which, give or take a few items, comes with me wherever I go.
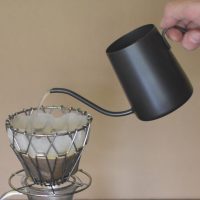
Continue reading...My Travelling Coffee Kit: Collapsible Coffee Filter
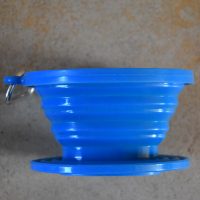 My original travelling coffee kit was a pretty simple affair (by my standards, at least), consisting of my AeroPress, a ceramic hand grinder and a cheap set of scales. Over the years, I added to it, with the likes of my Travel Press, Aergrind hand grinder, a metal jug and, occasionally, an electric kettle joining the ranks. It got to the point that, four years ago, I even wrote an article about it.
The one thing my set-up lacked was the ability to do pour-over. This was rectified first by the gift of a collapsible metal filter cone, and then, on a trip to China two years ago, the purchase of a small (360ml) gooseneck jug. Suddenly, I could do pour-over on the go! However, while I was enamoured with my jug, I had my struggles with the filter cone, so when Amanda gave me another collapsible filter cone as a present at the start of last year, I immediately pressed it into use, keen to see how it compared to my existing metal filter.
Continue reading...My Travelling Coffee Kit, Part II
 A couple of years ago, I wrote about my travelling coffee kit. Back then, I was regularly packing my AeroPress and Travel Press, my Aergrind hand grinder, a set of scales, a metal jug, the occasional kettle and, finally, a decent reusable cup. Fast forward a couple of years, and that’s still the core of my travelling coffee kit, except that recently I’ve added a couple of items to it.
You might think that I already have enough coffee kit and, honestly, I might feel inclined to agree. However, when I first wrote that piece, while travelling a bit for work, much of my travel was for pleasure, often visiting places with great coffee shops, so my travelling coffee kit wasn’t as important.
Since then, as a result of acquiring a gooseneck kettle, I’ve become enamoured with pour-over, something my current kit doesn’t support. I’m also spending far more of my time travelling for work, and I’ve found that I’m missing my pour-over. Therefore, on my most recent trip to China, I decided to do something about it. However, travelling with a V60 and a large pouring kettle (on top of everything else) is impractical, so I needed an alternative.
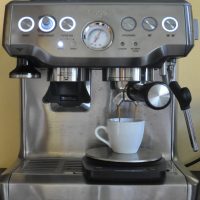
Continue reading...Sage Barista Express
Soon after starting the Coffee Spot, my faithful Gaggia espresso machine gave up the ghost and I was on the market for the replacement. The Rancilio Silvia, by overwhelming consensus, was by far the best single-boiler home espresso machine for under £400, so four years ago, I became a proud Silvia owner.
Fast-forward a year and Sage launched its dual boiler home espresso machine, instantly becoming a market-leader. However, it was well beyond my price-range (£1,200) and, well, I had my Silvia. A year later, Sage extended the range, introducing two single-boiler machines, the entry-level Duo-Temp Pro (£380), and the Barista Express (£600), with a built-in grinder.
Again, I was impressed. I only managed to play with them at various coffee festivals, but even I managed to pull decent shots on them. I also heard nothing but good things from friends who owned them, so I began recommending Sage if people asked about home espresso machines. Despite this, I didn’t actually own one, largely because Silvia still had plenty of life left in her and represented a significant investment. Then, shortly before Christmas, Sage asked if I’d like a Barista Express. Well, I wasn’t going to say no, was I?
Continue reading...Sage Barista Express Revisited
Just before Christmas 2016, my home espresso experience was significantly improved by the arrival of a Barista Express espresso machine, a kind (unsolicited) gift from Sage. I already had a Rancilio Silvia, which I’d bought four years earlier, but I’d largely fallen out of love with home espresso due to problems in pulling consistent shots (with hindsight, this was as much to do with a replacement grinder which wasn’t able to grind finely enough).
In contrast, the Barista Express has a built-in grinder. It’s also remarkably easy to use. Within a couple of days, I was pulling consistently good shots and, it was fair to say, I was converted. I carried on using the Barista Express for a couple of months, then I wrote up my experiences in what has gone on to become the single most popular post on the Coffee Spot!
For the next few years, I travelled a lot for work, so was only intermittently using the Sage. However, for the last year, I’ve been making an espresso pretty much every day and, as a result, I’ve refined my recipe and technique. In light of this, I decided to was time to revisit the Sage Barista Express…
Continue reading...Soulhand Gooseneck Kettle
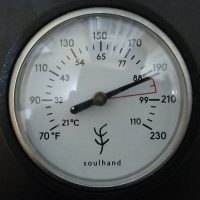 Readers with a long memory will recall that it was almost exactly five years ago that I wrote about my Bonavita gooseneck kettle, marking the point at which I became a firm gooseneck kettle enthusiast. Since then I’ve added a number of gooseneck kettles to my arsenal, including a basic electric model from Bodum, which I keep at my father’s house, and a pouring jug with a gooseneck spout, which I use exclusively for travel. And now I’ve added a fourth, a gift from Soulhand, a US company, which offered me a gooseneck kettle with a built-in thermometer (the good news is that Soulhand ships direct to the UK).
I’ll be honest: I wasn’t sure I was going to like it. Unlike my previous kettles, which have been electric, this is a stovetop model, which works on a hob, and which felt to me like a backwards step. On the plus side, there’s the built-in thermometer, which is one of things that I didn’t realise I needed until I used it (much like the gooseneck kettle itself). In the end, it won me over and I learnt a few useful things along the way, which was a bonus.
Continue reading...Temperature-Sensitive Milk Steaming Jug
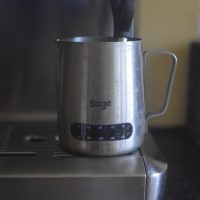 Some of my coffee-making equipment, such as the subject of last weekend’s Saturday Supplement, the Sage Barista Express espresso machine, are quite valuable pieces of kit. Some, on the other hand, are fairly cheap, and yet have had a huge impact on my coffee-making. The humble digit scale is a good example: costing as little as £10, scales really helped improve my coffee brewing. Today's Saturday Supplement is all about a similarly inexpensive piece of kit which has helped my milk steaming (although, alas, not my latte art): the Sage Temp Control, a temperature-sensitive milk steaming jug.
Getting the temperature of the milk just right is really important when it comes to coffee. No-one wants a lukewarm flat white, but neither should it be too hot. If the milk gets above around 65°C, it undergoes a series of irreversible chemical reactions which significantly change the way it tastes. I know that skilled baristas can judge the perfect temperature just by touch, but mere mortals such as myself, who make a once-a-week milky espresso drink (I hesitate to call what I make a flat white) need a little help, which is where the temperature-sensitive milk steaming jug comes in.
Continue reading...Return to the main Coffee at Home page.