 A couple of years ago, I wrote about my travelling coffee kit. Back then, I was regularly packing my AeroPress and Travel Press, my Aergrind hand grinder, a set of scales, a metal jug, the occasional kettle and, finally, a decent reusable cup. Fast forward a couple of years, and that’s still the core of my travelling coffee kit, except that recently I’ve added a couple of items to it.
You might think that I already have enough coffee kit and, honestly, I might feel inclined to agree. However, when I first wrote that piece, while travelling a bit for work, much of my travel was for pleasure, often visiting places with great coffee shops, so my travelling coffee kit wasn’t as important.
Since then, as a result of acquiring a gooseneck kettle, I’ve become enamoured with pour-over, something my current kit doesn’t support. I’m also spending far more of my time travelling for work, and I’ve found that I’m missing my pour-over. Therefore, on my most recent trip to China, I decided to do something about it. However, travelling with a V60 and a large pouring kettle (on top of everything else) is impractical, so I needed an alternative.
You can see what I came up with after the gallery.


 1
1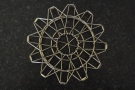 2
2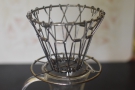 3
3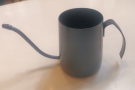 4
4The impetuous for my travel kit revamp actually came last year when I received a Kikkerland collapsible filter cone as a present from a Canadian friend. However, that was only one part of the equation. Historically I had always struggled with pour-over, only really getting to grips with it when I acquired my gooseneck kettle. The extra control that came from pouring with a gooseneck made all the difference.
I experimented with my new collapsible cone at home and found that it gave acceptable results, but with a bit more hassle than using my regular cones (which we’ll come to). However, that was using my gooseneck kettle and since I wasn’t going to have access to that on a regular basis during my travels, I put the collapsible cone on the back-burner (not literally, I might add!).
The germ of the idea to revive the collapsible came during my trips to Japan last year, where pour-over filter coffee is king. I started to wonder if I could get myself a small, light gooseneck pouring jug (as distinct from a kettle, which I would use to heat the water, this would purely be for pouring water that had already been boiled). I figured that, given the popularity of pour-over, such a device must be available in Japan.
Then it came to my recent trip to China, where pour-over is just as prevalent and so, at the last minute, I popped my collapsible filter, plus a few filter papers, into my coffee kit bag (a Grindmsith tote bag in case you were wondering) and off I went. As I travelled around the various coffee shops of Shanghai, I kept my eyes peeled and, as luck would have it, on I saw exactly what I was looking for on a shelf in a coffee shop in a shopping mall: a small (360ml) gooseneck jug for the princely sum of under £5.
I immediately bought it, along with an espresso, which, if I’m honest, was far less impressive than the jug (suffice to say that the coffee shop won’t be appearing on the Coffee Spot!) and the rest is history.


 1
1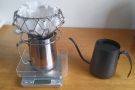 2
2 3
3 4
4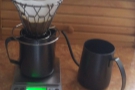 5
5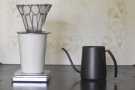 6
6 7
7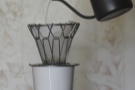 8
8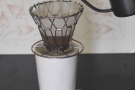 9
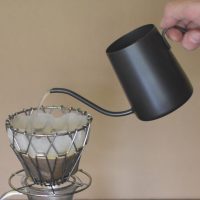
9We’ll start with the jug, which is a simple, light, open design, with an open metal handle. As I’ve said, it has a capacity of 360ml, with the inside marked at 100, 200 and 300ml. It lacks a lid^, but the only model I could find with a lid was a 600ml model, which was too big for my purposes. I used it as soon as I got back to my hotel room with some divine beans from Yunnan (a gift from the baristas at UNDEF/NE) and it was an immediate success.
The handle is well-balanced with the rest of the jug, making pouring easy, while the gooseneck spout gives a high degree of control, as good as anything I could get at home with my full gooseneck kettle. With a capacity of 360ml it’s more than enough for a single pour-over and it looks pretty robust (so far it’s survived the trip back from China, but will be coming to America with me).
However, there are some minor downsides. The first is the lack of temperature control. Obviously, you put boiling or near boiling water into it and immediately it will start to cool, the lack of a lid not helping in that respect. I’ve not invested in a small, clip-on thermometer, so I can’t tell you how quickly the water cools, but I can say in the limited testing I’ve done that the pour-overs it makes are pretty good, so any drop I temperature through the brewing process isn’t critical.
The second slight drawback is the size. Although the body of the kettle is quite small, the handle on one side and the long, thin gooseneck on the other do mean that it takes up a surprising amount of space, which can be an issue when packing. I’ve kept its original box (which is already showing signs of wear) and am considering how best to pack it when travelling so as not to waste too much space (in terms of weight, it’s fine, by the way).
The verdict on the gooseneck jug? An unqualified success! But what about the other part of the equation, the collapsible cone? You can see what I made of that after the gallery.
^ I have solved the lid problem (and am rather annoyed at the time it’s taken me to do so). After having my gooseneck jug for over six months I belatedly realised that the lid of my Travel Press fits it perfectly! Problem solved.


 1
1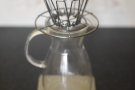 2
2 3
3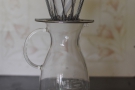 4
4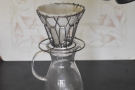 5
5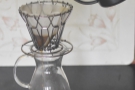 6
6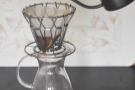 7
7 8
8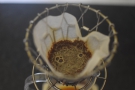 9
9 10
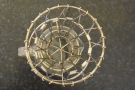
10The collapsible filter cone is a pretty nifty piece of a kit. Made of a flexible metal lattice, it does indeed collapse almost flat, making it perfect for travelling. When extended, it can be made into a variety of shapes, from the classic, straight-sided cone to a basket shape, more akin to a Kalita Wave. The most obvious question is which shape to use and that, frankly, depends on your filter papers. I’ve tried it with three different filter papers, classic V60, Kalita Wave and Filtropa, which fit wedge-shaped filters such as the Melitta filter and Clever Dripper.
Let’s start with the ubiquitous V60, perhaps the most natural choice of paper. They’re widely available and fold completely flat, so they pack down easily. Indeed, you can slip a few in the box with your collapsible filter. However, there is an immediate problem with the design of the cone. If you look at the first picture in the gallery, you’ll see that the six ribs of the cone all come together in a central point. Compare this to a classic V60 and it’s exactly where the central hole is.
If you’ll excuse the pun, the whole point of the V60 is the central hole. That’s where the tip of the filter paper goes and where the coffee drips out. With the collapsible cone, you have to try to fit the tip of the filter paper into one of the triangular, off-centre gaps at the bottom of the cone. In turn this means that the filter paper no longer sits symmetrically in the cone, which, when you come to brew your coffee, has serious consequences.
At first, everything seems fine. You can rinse the paper without issue and put the ground coffee into the bottom with no problems. However, whenever I poured in the water, the combined weight of ground coffee and water pulled down on the sides of the filter paper. I suspect that with a central hole, there wouldn’t be too much of a problem, but with the tip of the filter off-centre, one side or other would always collapse, leading to a very uneven distribution of water/coffee in the cone, which in turn would lead to clogging.
I found the whole process very frustrating, and, while I did get some decent brews using V60 filter papers, it was always a struggle. So, if the V60 is ruled out, what about the alternatives?
You can see how I fared with Kalita Wave filters after the gallery.


 1
1 2
2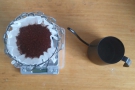 3
3 4
4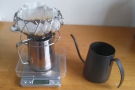 5
5Looking at the collapsible filter cone, the triangular arrangement at the end of the cone naturally leads to a flat, approximately circular bottom, immediately bringing to mind the Kalita Wave. You can also slightly flatten the cone so that it produces a more basket-like shape which again suits the Kalita Wave.
As a result, when I first tried the cone out at home, I used Kalita Wave filter papers. I found that these gave the best results, with the flat bottom avoiding clogging, while the ribbed sides avoided any collapse in the filter paper. If I was using it at home, I’d suggest Kalita Wave filter papers every time.
However, there’s one big drawback when you’re travelling. Although Kalita Wave filter papers are stackable, you can’t fold them flat. As a result, they take up quite a lot of space (says the man who travels with various mugs, jugs and other coffee kit). However, having a collapsible filter cone with stackable filter papers rather defeats the object. If I were to go down that route, I may as well by a Kalita Wave filter, put the papers inside it for storage when travelling and be done with it.
So, while the collapsible cone works well with Kalita Wave papers, it’s rather self-defeating, which leads me to my third option, Filtropa filter papers, which you can read about after the gallery.


 1
1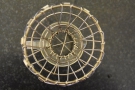 2
2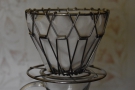 3
3 4
4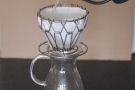 5
5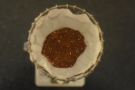 6
6 7
7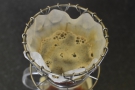 8
8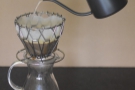 9
9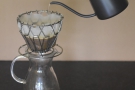 10
10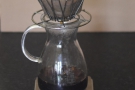 11
11 12
12In many ways, the Filtropa filter papers are a compromise. They fold down like the V60 papers, but, rather than narrowing to a point, they have a ridge at the bottom, fitting fairly nicely along the base of the collapsible filter. Initially I used the filter in a V60 configuration, but, since the cone was symmetrical while the filter was more wedge-shaped, I found that there were still problems with the sides of the filter paper collapsing.
Instead I quickly adopted a slight basket shape, not as exaggerated as for the Kalita Wave, but with near vertical sides at the top. This allowed me to tuck the top of the filter paper into the lattice, which really helped reduce the tendency of the sides of the filter paper to collapse. The results have been pretty good and while there’s still a tendency for the filter to clog, it’s resulted in some consistently good brews, with much less hassle than the V60 filter papers.
I’ll leave you with one more observation. At home, I use a stand for all my pour-over brewing, which means that I can put the carafe on the scales and weigh the water that comes through the filter (that is, the weight of the extracted coffee). With the collapsible filter cone, I’m putting it and the carafe on the scales, so I’m weighing the water that I’m putting into the filter.
You might think that this isn’t much of a difference, but you’d be surprised. Typically, for a 300ml pour, I find I get about 240ml of coffee out (depending on the grind size), so I’ve had to tweak my recipes a bit. That said, the filter stand I use at home is easily dismantled and packs flat, so I could bring that with me too, although that might be a step too far, even for me!
You can find my overall verdict, plus how you can get your hands on the kit without having to go to China/Canada, after the gallery.


 1
1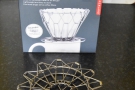 2
2 3
3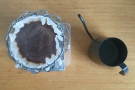 4
4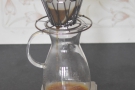 5
5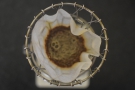 6
6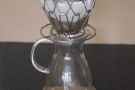 7
7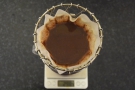 8
8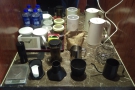 9
9In conclusion, what have I learnt from all this? Well, the big winner is the gooseneck pouring jug, particularly since I’ve worked out that the lid from my Travel Press fits it perfectly, although it does take up a fair bit of space. The collapsible filter cone is a bit hit-and-miss. The big design flaw is the lack of a central hole, which means that the best filter papers are Kalita Wave papers which can’t fold flat, rather removing the collapsible cone’s biggest selling point: that it collapses. The compromise is to use Filtropa filter papers with a ridge at the bottom, but is the compromise (and the hassle of adding the kit and filter papers to my already large amount of coffee kit) worth it?
Well, the answer to that will always be a personal one, but for me, it’s a resounding yes. Since falling in love with pour-over, there are certain coffees (the Yunnan from UNDEF/NE springs to mind) that just need to be made as a pour-over. The Travel Press and Aeropress just won’t cut it. In previous years, where I’d be away for a few weeks at a time, a few times a year, I could live without it, but these days, when I’m away a month at a time, four or five times a year, it’s worth it. So, for the foreseeable future, the collapsible filter cone and gooseneck pouring jug have been added to the travelling coffee circus.
Finally, for those of you without friends in Canada and who aren’t going to China any time soon, is there anything you can do? Well, if I’ve tempted you, or if you just fancy getting into pour-over for a relatively low investment, the good news is that internet is your friend. Gooseneck pouring jugs like mine are readily available on the internet for under £10 (typing “gooseneck pouring jug” into a search engine just now produced multiple hits). You might also want to take a look at the OE 3-4-5 Pitcher.
For the collapsible filter cone, there are also plenty of options in the £10 – £20, including several different designs, which I found by type “collapsible coffee dripper” into a search engine, although if you are looking to get into pour-over at home, there are plenty of drippers, both V60 style and for ridge-bottomed filter papers, for under £10.
March 2021: I am now the proud owner of a collapsible silicone filter cone, which has all the advantages of the metal one, and none of its drawbacks. It (and the filter papers) now has a permanent place in my travelling coffee kit alongside my gooseneck jug.
If you liked this post, please let me know by clicking the “Like” button. If you have a WordPress account and you don’t mind everyone knowing that you liked this post, you can use the “Like this” button right at the bottom instead. [bawlu_buttons]
Don’t forget that you can share this post with your friends using buttons below.