 Since I started the Coffee Spot almost four years ago, I’ve changed both the way I make my coffee at home and the way I drink it. From primarily using a cafetiere and putting with milk in my coffee, I now always drink it black. Along the way, I’ve picked up a variety of coffee-making methods, including my trusty Aeropress, several different types of pour-over filter cone and I’ve even got a travel-friendly equivalent to my cafetiere in the shape of the Espro Travel Press.
With these new methods have come new techniques and, inevitably, new tools. For example, I now use scales, not just to weigh my beans, but also to measure the amount of water I use when making filter coffee. However, until recently, the one item I lacked was a gooseneck pouring kettle. Initially, I poured from a jug, before progressing to an old coffee pot with a long spout that I picked up from Oxfam.
At that point, I rather fancied the gooseneck kettle to be an unnecessary luxury, a stylish accessory that added looks, but not substance. Then I actually used one and suddenly, everything was turned on its head…
You can see what happened next after the gallery.


, along with Woody, my Knock Grinder.")
 1
1 2
2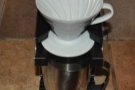 3
3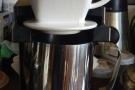 4
4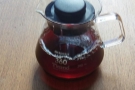 5
5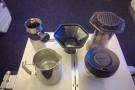 6
6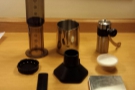 7
7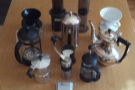 8
8 9
9I honestly can’t remember when I first used a gooseneck kettle, which surprises me since I went from sceptic to convert in a matter of seconds. Until then, I’d not really given much thought to the actual process of pouring water while making filter coffee. To me, it was just a matter of putting water onto coffee grounds, something you can just about get away with in immersive techniques such as a cafetiere or Aeropress, but which (I discovered) doesn’t really work when it comes to pour-over. Which might explain why I never really mastered the method!
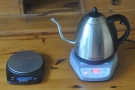
Then I tried the gooseneck for myself and suddenly understood what baristas meant when they talked about control. With a jug, you tip it up and water comes out. Some water. And it goes somewhere. Usually roughly where you want it. And, if you’re careful, you can get to within 10 grams of the quantity you want, maybe five if you’re good. With a gooseneck kettle, I can pour as little as a gram of water and I can pretty much put it exactly where I want.
With a cafetiere or Aeropress, this matters less, because you are pouring a set amount of water into a cylinder, mixing it thoroughly (usually by stirring) and then leaving to brew. When it comes to pour-over, particularly something like a V60 or Chemex, where you are periodically adding small amounts of water, being able to control how much you pour and where you pour it becomes really important. I really do believe that my recent acquisition of a gooseneck kettle has significantly improved the quality of my pour-over. Plus it’s a lot more fun!
However, I’m getting slightly ahead of myself. Having made the case for a gooseneck kettle, I still baulked at splashing out on one. They come in two types, with or without a heating element. Those without heating elements are cheaper, but there’s the problem that once you’ve filled it up, the water immediately starts to cool. Again, this is less of a problem with immersion methods, but when continually topping up a pour-over, you ideally want the water to be at the same temperature each time. Hence you need a heating element. The only problem? It can double the price of the kettle. Is it really worth it?
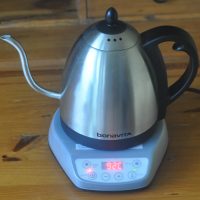
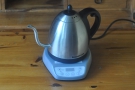
With hindsight, the answer’s an obvious yes, but at the time, I wasn’t sure. Then came the turning point. I was at this year’s London Coffee Festival, visiting the Bonavita stand, looking at the new 8-cup automatic coffee brewer. Would I like one? Well, err, that’s very kind, but actually, no, not really. I enjoy making coffee and I really have no use for an 8-cup brewer. However, Bonavita had also just launched its new gooseneck kettles and I saw my opportunity! A quick conversation later and Bonavita had not only kindly agreed to give me a 1 litre gooseneck kettle, but also a set of its new waterproof auto-tare scales.
These arrived in April and I’ve been using them ever since for practically all my home coffee making. I’ve even taken the scales on a couple of trips with me. I’ll write about the scales in a future Saturday Supplement, but today I really want to talk about the kettle.
You can see how I got on after the gallery (hint, I really liked it!).


 1
1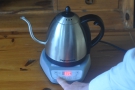 2
2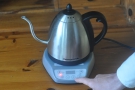 3
3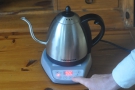 4
4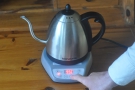 5
5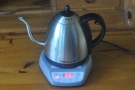 6
6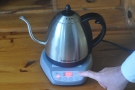 7
7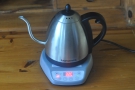 8
8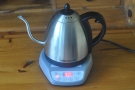 9
9My Bonavita kettle is really simple to use. Just plug in the base unit, put some water in the kettle, and off you go. Well, okay, not that simple. There are actually six buttons on the base which, between them, control an array of functions.
First things first. This kettle doesn’t just boil water. In fact, I’ve never used it to boil water. Instead, it heats water to whatever temperature you tell it in either Celsius or Fahrenheit (you can toggle between the two using the button at the top-right). When you switch the kettle on (button on the bottom-left), the kettle flashes at you, displaying the current target temperature.
If you do nothing, in a few seconds, the display will stop flashing and instead displays the current temperature of the water in the kettle. The kettle’s now heating the water and you can watch the display tick slowly up, until it gets to the target temperature, at which point, as if by magic, it stops heating.
Bingo! And that’s as simple as the operation gets.
But what if you want to change the target temperature? Well, that’s simple too. There’s a button in the top-left that cycles through a series of pre-set temperatures. However, these all seem to be set for tea brewing, so, unsurprisingly, I don’t use them. Instead, I use the second method. While the display is still flashing, press either the + or the – button below the display. As you might expect, the + button increases the target temperature by 1⁰C (or 1⁰F if you really must) and the – button decreases it by one degree. When you reach the correct temperature, leave it for a few seconds and the kettle starts up. For the record, I use 92⁰C for cafetiere/Aeropress and 94⁰C for pour-over.
So far, so good. But what happens when your kettle has reached the required temperature? Well, as I’ve said, it switches off. Which means that the water starts to cool down. This is where a handy feature called the Hold button (bottom-right) comes in. Just hit the Hold button at any point and a green light will come on. As long as the green light is on, when the kettle gets to the target temperature it will hold it there. This means that you can set your kettle going, go away and prepare your kit, grind your beans, etc, and when you come back, the water will be at exactly the right temperature. Excellent!
The final feature is a timer. When you take the kettle off the base, the display goes to zero. Press the + button and a timer will start, the display showing the elapsed minutes and seconds since you hit the + button. Putting the kettle back on the base will stop the timer.
So, that’s the theory. What’s it like in practice? You can find out after the gallery.


.")


.")

...")


.")


 1
1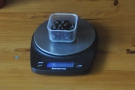 2
2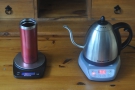 3
3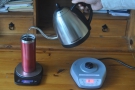 4
4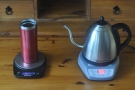 5
5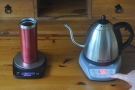 6
6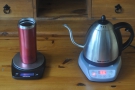 7
7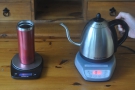 8
8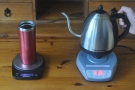 9
9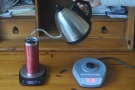 10
10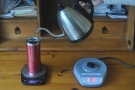 11
11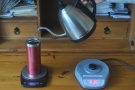 12
12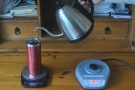 13
13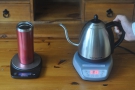 14
14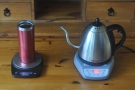 15
15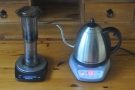 16
16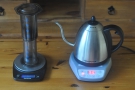 17
17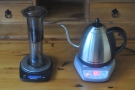 18
18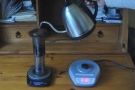 19
19 20
20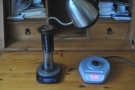 21
21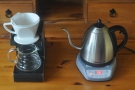 22
22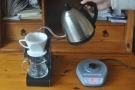 23
23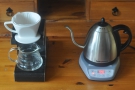 24
24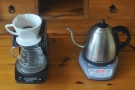 25
25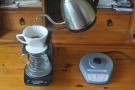 26
26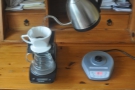 27
27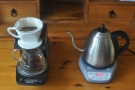 28
28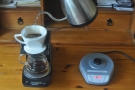 29
29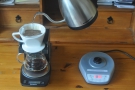 30
30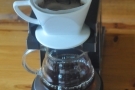 31
31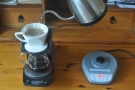 32
32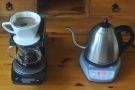 33
33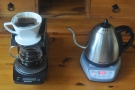 34
34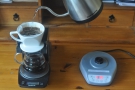 35
35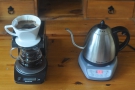 36
36 37
37My Bonavita kettle does the basics (heating water) extremely well and it does the pouring exceptionally well. I love the control that the gooseneck gives me and the handle is really easy and comfortable to hold. I tend to use the Hold button a lot and I’ve found that the kettle keeps the temperature well, varying by no more than ±1⁰ which is remarkably good temperature stability. I should say that I am relying on the in-built temperature readings, which I have no reason to doubt. However, I have not actually independently verified the temperature of the water.
What follows are a series of niggles and quirks, which, while important, do not in any way diminish my love for this kettle.
The first thing to say is that I don’t use the timer function. All of my filter methods involve at least two pours, the first one being to bloom the coffee. Since the timer resets when I put the kettle back on the base, I can’t use it to time the entire brew. Of course, I could put the kettle down elsewhere, but the reason I put it back on the base is so I can use the Hold button to keep the temperature constant. Not putting back on the base defeats the object, so I don’t use the timer.
The second thing is I don’t actually know how long it takes to heat the water. It sounds silly to say this, but again, because I use the Hold button, I fill it up, set it going and then go off to do other things. Invariably by the time I return, ready to make my coffee, it’s reached the target temperature. In that respect, let’s say it heats the water sufficiently quickly!
Talking of putting the water in the kettle, because it’s sold steel (and very pretty it is too) I find it very hard to judge how much water is actually in there. This is quite important because after a couple of pour-overs when I ran out of water before I’d finished, I was getting quite annoyed. Of course, I could fill it right up, but then I’d be heating more water than I need, which I dislike doing. Fortunately, I have a pair of scales, so now I just put the kettle on the scales (empty weight, without lid, 550g) and pour in the required amount of water. Bingo.
Finally, whenever you take the kettle off the base, the base switches off. This means that if you return the kettle to the base between pours, you have to remember to switch it on (in my case, by hitting the Hold button) otherwise it won’t heat the water/hold it at the target temperature. Although this is annoying, it’s understandable: without an automatic switch-off, you could put an empty kettle back on the base and that would be very bad indeed…
So, inclusion, I am a total gooseneck kettle convert. Is it worth the money? Well, on the one hand, it’s hard to say since I didn’t actually pay for this one. On the other hand, if it broke tomorrow, I’d go out and buy a new one! So, on balance, yes.
In closing, I’d like to thank Bonavita for the gift of the kettle and the scales. I feel obliged to point out that there are other brands of both kettles and scales out there. Nothing in this post should be taken to imply that the Bonavita products are superior (or indeed inferior) to their competitors. With that in mind, I found this article by Matt Viser of the Boston Globe, where he looked at various kettles on the market (although this was about 18 months ago). You can also take a look at this piece by my friend John of Manual Coffee Brewing, where he discusses the merits of gooseneck kettles in general.
December 2016: Bonavita Gooseneck Kettle was a runner-up for the 2016 Best Saturday Supplement Award.
If you liked this post, please let me know by clicking the “Like” button. If you have a WordPress account and you don’t mind everyone knowing that you liked this post, you can use the “Like this” button right at the bottom instead. [bawlu_buttons]
Don’t forget that you can share this post with your friends using buttons below.
Gahh I want one so much =) you can control the water so well it makes such a difference. great article.
Jess
Thanks 🙂
Pingback: The Coffee Spot Christmas Gift Guide 2016 | Brian's Coffee Spot
Pingback: London Coffee Festival 2017: Kit & Cups | Brian's Coffee Spot
Pingback: The Coffee Spot Christmas Gift Guide 2017 | Brian's Coffee Spot
Pingback: My Travelling Coffee Kit, Part II | Brian's Coffee Spot
Pingback: The Coffee Spot Christmas Gift Guide 2019 | Brian's Coffee Spot
Pingback: Making Coffee at Home | Brian's Coffee Spot
Pingback: Vietnamese Coffee Part III | Brian's Coffee Spot
Pingback: Making Coffee at Home: Clever Dripper | Brian's Coffee Spot
Pingback: Making Coffee at Home: Pour-over | Brian's Coffee Spot
Pingback: 2020 Awards – Best Filter Coffee | Brian's Coffee Spot
Pingback: Soulhand Gooseneck Kettle | Brian's Coffee Spot
Pingback: Making Coffee at Home: AeroPress (Revisited) | Brian's Coffee Spot
Pingback: 2021 Awards – Best Filter Coffee | Brian's Coffee Spot
Pingback: 2022 Awards – Best Filter Coffee | Brian's Coffee Spot